14 March 2024
In-crop slurry application to cereal crops – timely tips
John Mahon, Teagasc Signpost Tillage Advisor, tells us more about how to manage the application of slurry to growing cereal crops in order to maximise nutrient recovery and lower chemical fertiliser costs.
On Irish tillage farms approximately 70% of GHG emissions are related to nitrogen use, therefore any measures which can reduce the amount of nitrogen applied and increase nitrogen use efficiency will bring about huge benefits to the environment in addition to reducing input costs on farm.
A growing trend with tillage farmers who have been using organic manures in the form of slurry for a number of years is to switch from the traditional application pre-cultivations in September/October prior to sowing winter cereals, towards applying in-crop in springtime replacing some or all of the planned first chemical nitrogen application, and utilising a nitrogen use efficiency up to ten times greater than autumn applied slurry.
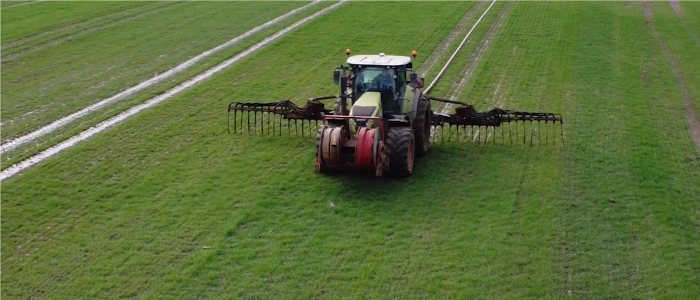
A 12m umbilical LESS application unit is normally used due to its capacity to cover ground quickly and cause no soil compaction damage due to its lighter weight compared to a slurry tanker combination.
If you are considering using organic slurry in springtime to winter cereal crops, the following management tips will help to maximise the benefit and eliminate any problems on the day.
Forward planning
- Before ever considering applying any organic manure, you must firstly determine if you have an allowance to apply. This should be determined during the winter months by completing a nutrient management plan (NMP) which will give the field by field allowances for N, P & K based on:
- Recent soil sample results
- Crop type grown
- Crop allowances from the Nitrates Directive (S.I. No. 113 of 2022)
If you have P index 4 fields, you cannot apply organic or chemical fertiliser to these, so slurry is not an option here.
- With the NMP completed, highlight the fields which are most suitable for slurry application based on:
- The P & K index readings (aim to apply to Index 1 and 2 in preference to Index 3’s)
- The proximity to the slurry source or storage facility
- How dry and trafficable the fields are in early spring
- Topography of the fields to prevent run-off to water courses or drains
- General soil health – aim to apply to worn tillage ground first as these will benefit most from a soil biology aspect
- If not your own slurry, organise a local dependable source (cattle, pig or poultry) and discuss the main considerations for a long-term reliable relationship agreement – including:
- The animal type, housing and diet fed – influencing the composition
- Quantities available and when available
- Any recent slurry analysis
- Transport logistics
- Cost per tonne
- Biosecurity measures
- What you require is a consistent product available in sufficient quantities, when you need it. At this point it may be really worthwhile taking a sample for laboratory analysis if a recent test is not readily available.
- Agreement on cost and transport terms should be finalised at this stage and not when the slurry is being applied to your farm.
- Organise the contractor with an umbilical LESS slurry application unit and capacity to carry out the work – important discussions include when you are likely to apply, slurry storage, and movement capacity to keep the umbilical system going.
Prior to application
- Agree logistics and application date with the contractor based on:
- Timing – Crop growth stage 23-29 (mid/late tillering). Crop wheeling damage will occur post GS 30 (stem extension) when driving off the tramlines
- Growth – this is the most important factor. If little/no growth at application, nitrogen use efficiency will be low (as with chemical fertiliser)
- Weather forecast – require a minimum 48 hour rain free period after application (as with chemical fertiliser)
- Soil conditions & trafficability
- Organise the slurry tank to be well agitated
- Take a representative slurry sample from the agitation point or slurry tap on the tanker for laboratory analysis
- If time doesn’t allow for laboratory testing, do a hydrometer test to determine the Dry Matter % of the slurry and use Teagasc Table 1 (below) to read the N, P, K content of the slurry
- Decide final application rate based on laboratory analysis or Teagasc Table 1 results and the crop P allowance from your NMP – aim to match the P requirement of the crop. If short on K this can be topped up when the next balancing application of chemical N will be applied

Teagasc video on slurry hydrometer test
On the day of application
- Monitor weather, soil conditions, and consistency of the slurry being applied
- Observe are logistics moving the slurry quickly enough to keep the umbilical applicator constantly moving, to maximise efficiency and reduce costs
- Record where the slurry was applied, and the rate and quantity applied
- Make sure all necessary buffer zones near watercourses are being observed
You must not spread organic manure within
- 5m of surface waters (extends to 10m for the first two and last two weeks of the spreading season)
- 10m of surface waters where the slope towards the water exceeds 10%
Post application
- Above all, don’t forget to reduce your chemical N, P & K crop application by the amount applied
- NEW: Farm to farm organic manure movement online DAFM notification must now be reported within 4 days of movement onto your farm (since March 2024)