Some simple steps before you spread

A fortune in fertiliser will pass through your spreader, Francis Quigley, Teagasc Farm Machinery and Milking Machine Specialist, discusses how careful preparation will help ensure none is wasted.
Fertiliser is increasingly expensive. Getting the spreader set up for the season will help ensure you get the best return on your investment. A pre-season service and calibration will help reduce the possibility of ‘striping’ and patchiness from uneven spread patterns.
Step 1
Check all the mechanical parts on the spreader. Look for cracks in the frame and hopper, check the gearbox and look for worn bearings. Take a look at the PTO shaft and all the safety covers and chains.
Step 2
Open the shutter on the spreader and check that both the left and right outlet in the hopper are equal. This can be done with callipers but it’s not that easy to measure accurately.
A better option is to do a flow test on the left and right outlet to ensure they are even. If the openings are not even then the first thing to look for is worn linkages, these will need to be replaced. To do a flow test remove both spreader discs and run the machine, collecting fertiliser from each outlet separately. The same amount of fertiliser should be collected in the buckets. If not then there is an issue. This is a common enough problem and can usually be fixed by adjusting or replacing worn linkages.
Step 3
Examine vanes on the spreader discs: Incorrectly adjusted, worn, bent or missing vanes are the most common cause of an uneven spread pattern. Even moderate vane wear changes the throw angle and distribution.
Now is the time to fit replacements before you start the season; if the vanes are ok make sure that they are moving freely so that angle adjustments can be made.
Why worn vanes are a problem:
- The vanes control the trajectory and speed of each granule. As they wear, the angle and smoothness of the trajectory changes, producing drift, feathering and asymmetry.
- Wear rarely happens evenly. One disc or a single vane out of shape will give a biased pattern left or right across the field.
- Trying to correct a spread pattern with shutter or vane angle settings while vanes are worn is often futile — the mechanical fault must be corrected first.
Step 4
Doing a tray test is the only way you can be sure that the fertiliser spreader is correctly set up. Testing hall and factory settings are extremely useful, but nothing can take the place of an in-field tray test of the actual machine, fertiliser and working speed you will be using.
A tray test shows the true pattern; it will enable you to identify if there’s an issue and get to the root of the problem. Sometimes poor spread pattern is caused by an uneven outlet left and right. Other times it’s due to worn vanes, or it might simply be incorrect vane angle.
Simple in-field tray test – practical steps
When you are doing the tray test I recommend that you do it on a calm day. Choose a fairly flat field as this will give the most accurate results. Humps and hollows may cause the spread pattern to show up as inconsistent.
The tools you will need are a tray test kit which includes a set of trays with inserts, a set of tubes and a funnel. You will also need a measuring tape and some markers; pigtail posts are ideal. To set up the tray test, mark out three bout widths at the spread width you are using. If you are spreading at 15m bout width mark out three runs 15m apart across the field using the pigtail fencing stakes. Starting at the centre post, place trays evenly spaced out to half the bout width in both directions (7.5m in this case).
Drive and collect
Set the spreader to the intended rate and vane settings for the fertiliser. I recommend using the manufacturer’s phone app for this. Then set the tractor to the correct PTO speed and gear you will use in the field.
Drive at the expected working speed across the trays. Make sure to open the shutter well before you reach the trays and not to close the shutter until you are well past them. You will collect the fertiliser after three runs over the left, middle and right pigtails. Then you can stop and carefully collect all the material in each tray, pour the contents into the tubes and compare the volume in each tube.
Analyse and adjust the results of the tray test
Compare the amounts left to right. You’re aiming for a symmetry, with equal amounts in each of the tubes. If the results are not even then you need to assess them to identify what the problem is. If there is a problem you need to adjust the spreader to correct for this and then redo the tray test.
Tray test result B
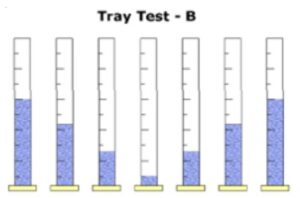
A “V”-shaped pattern – in this case the fertiliser is travelling too far, you need to reduce the energy applied to the fertiliser. You can do this by reducing the vane angle on the fertiliser spreader so the fertiliser leaves the vane earlier.
Tray test result C
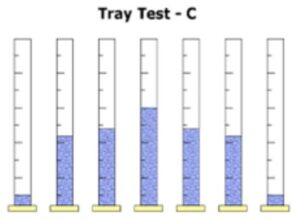
An “A” shaped pattern – in this case the fertiliser is not travelling far enough, so we need to increase the energy applied to the fertiliser. You can achieve this by increasing the angle of the vane so the fertiliser spends longer on the disc and as a result travels further. (This pattern might also be caused by the fertiliser spreader being too low or sloping backwards.)
Tray test result D
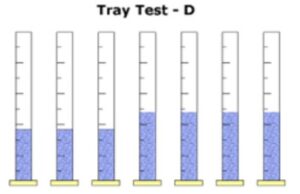
High on one side, in this case the fertiliser is spread evenly both left and right but there is more fertiliser on the right side. This is caused by uneven shutter openings. The right-hand side shutter is open more than the left. This is likely caused by worn linkages between the ram and the shutter.
Tray test result E
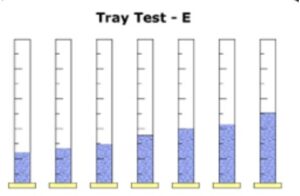
Low on one side and rising gradually to the other side. This is more than likely caused by the spreader being incorrectly mounted on the tractor, or the tractor tyre pressure is low on one side. Setting the tractor and spreader up so that they are level will generally sort out this.
After making adjustments, repeat the tray pass until you reach an acceptable pattern. It is important to remember that different fertilisers will have different spread patterns. You need to do a tray test for each of the fertilisers that you use.
If you find that a fertiliser product has changed considerably during the year, i.e. granule size or weight then it is important to do another tray test to check that the spread pattern is still ok.
It doesn’t matter whether you have an entry-level spreader or a top-end GPS controlled one it is still necessary to carry out a tray test to check spread pattern accuracy.
Time spent on spreader checks, vane replacement and a few tray tests at the start of the season will repay itself many times over – through better nutrient use, improved sward performance and reduced environmental risk.
Watch a video showing a tray test here.
This article was first published in Today’s Farm