21 February 2023
Six steps you need to take for accurate fertiliser spreading
Achieving accuracy has been made more challenging thanks to the use of wider spreading machines and varying physical characteristics of fertilisers, particularly urea.
Dermot Forristal, Teagasc Oak Park, explained how focusing on the following six points will help in the recent edition of Today’s Farm.
1. Know your fertiliser quality
While the chemical analysis of a fertiliser is controlled, the physical properties – size, shape, strength and density of the particles – are not. These can have a huge impact on how easily the fertiliser is spread, and particularly on the optimum setting/adjustment of the spreader.
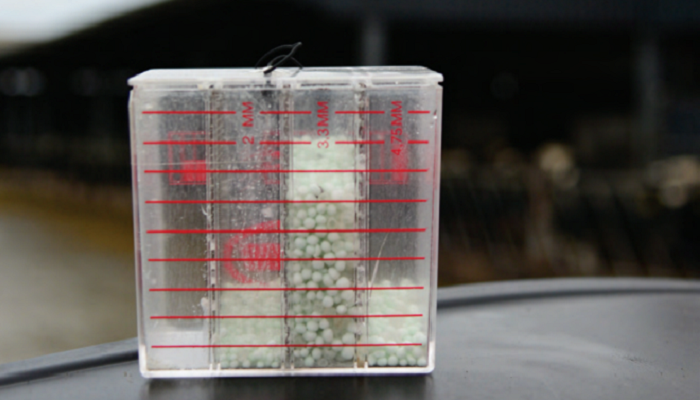
A good fertiliser will have a relatively large particle size, with 80% of the particles in the 2mm to 4mm size range. This can be checked with a simple sieve box (pictured above). Many fertiliser types have a density of about 1kg/litre, but urea (either standard or protected), has a density of about 0.8kg/litre making it more difficult to spread, limiting the bout widths and usually requiring a different spreader setting.
Larger particles make spreading a little easier and this is particularly true of low density urea. The marketing of blends which contain both low density urea and high density phosphorous (P) and potassium (K) elements presents a particular challenge and should be considered with a lot of caution, as the different constituents may spread to different widths.
Particle strength is also important, as weak particles can break up on hitting the spreader disc vane – strength can be easily tested. Always ask your supplier about the physical quality of a fertiliser.
2. Know your spreader’s capabilities
Specific makes and models of fertiliser spreader have different capabilities in terms of the bout width at which they can spread different products evenly. Urea may not be spread as widely or evenly in most cases.
The most important characteristic of any spreader is its ability to spread fertiliser evenly, as indicated by a tray test. This produces a coefficient of variation (CV) value. CV values of less than 10% indicate even spreading. The design of the disc, vane and spreader outlet determine how evenly it spreads and is not necessarily helped by electronic control or GPS systems. Relying on the absence of striping in the target crop as evidence of even spreading is not good enough – always look for evenness test data when purchasing a spreader.
3. Set your spreader for even spreading
Today’s fertiliser spreaders typically have an adjustable spread pattern that can be changed to suit the bout width for the fertiliser product being used (size, density and strength). Some of: disc type, vane type, vane position, spreader tilt, fertiliser drop point etc may need to be changed. Manufacturers of good spreaders continually test a huge range of products so that the user can match their fertiliser with something in the fertiliser manufacturer’s database. Increasingly, this is being done through a smartphone app, or an online web page. Typically, a simple fertiliser sieve box, density check and strength test are used to characterise the fertiliser to get the appropriate settings. This should be carried out for every batch of fertiliser.
4. Set the rate correctly
Setting the desired application rate can also be aided by using the spreader manufacturer’s resources, but static calibration using the actual fertiliser being applied is usually worthwhile. Some manufacturers produce calibration aids such as fertiliser flowrate calculators which can ease the task. Spreaders with weigh cells or electronic flow measurement devices allow self-calibration. As fertiliser varies from batch to batch, calibration checks are vital – relying on estimates and adjustments after each paddock or field is finished can result in a lot of area being spread at the incorrect rate.
5. Measure carefully or use GPS
Marking bout widths by using tramlines in cereals, using temporary markers, or GPS guidance is essential for spreaders working with bouts of 12m and more. Simple light bar or screen guidance GPS systems rely on good operator skill to ensure accuracy, with higher resolution systems and auto-steer increasing accuracy, but at a significant cost. GPS systems, which automatically turn on and off fertiliser flow at the headlands, can also improve accuracy. Modern spreaders often have turn-on points 15m to 20m or more from the end headland. This can be very difficult to judge by eye, resulting in significant overspreading when leaving the headland. If GPS switching at the headlands is not an option, the correct turn-on points should be marked in the field to allow the operator calibrate their own eye for this distance.
6. Set-up headland spreading systems carefully
Broadcast spreaders need to have a different spreading arrangement for use on the field boundary to get the correct rate up to the boundary, and to avoid spreading past it. Modern spreaders, by design, have a large overlap of fertiliser from adjacent bouts to give an even spread, but on headlands, we need one side of the pattern to deliver the same quantity of fertiliser without overlap to the field edge. This is challenging and manufacturers use a range of different methods including deflectors, different discs, vanes and drop points to achieve this, but none of these are perfect and often require very careful setting using trays. Between inaccurate on/off switching and incorrectly adjusted headland mechanisms, significant errors at field headlands can occur (see below panel). Correct selection, setting and use of fertiliser spreaders is essential to ensure even spreading and requires accurate information about fertiliser quality. Getting the basics right is vital.
Headland research
In a Teagasc study of fertiliser spreading on cereal field headlands on 17 farms, Mark Ward found that:
- Fertiliser spreading was uneven, with the first 8m of the headland getting 20% less than the target rate but the next 8m getting 20% more than intended;
- These average figures hid the much greater variation on individual farms, with some parts of the headland getting virtually no fertiliser and others getting more than 50% more than the targeted rate;
- Both the headland spreading mechanism and the fertiliser on/off switching when leaving or approaching the headland were contributing to these errors.