Pádraig O'Connor discusses the importance of a consistent, hygienic milking routine and offers practical tips for maximising milk quality, ensuring cow and milker safety, and improving overall efficiency.
The milking routine, from start to finish, has a significant impact on the efficient and hygienic removal of milk from the udder. Milking starts when you begin collecting the cows from their housing or the field. The importance of routine cannot be over emphasised. Cows are creatures of habit, and the more you can make each day exactly the same as the previous day, the more relaxed and productive they’ll be. Getting your milking routine right is good for you, your cows, and your business. The benefits are threefold:
- Maximum product quality.
- Safety for milker and cows.
- Efficient use of time spent milking.
Preparing for Milking
Before the cows are collected for milking, ensure that the milking parlour is ready. This will allow the milker to start milking once all the cows are in the collecting yard, thereby avoiding any unnecessary stress on the cows waiting to be milked. The milker needs a clean milking apron/parlour suit and clean disposable nitrile gloves to help prevent the spread of mastitis during milking and also protect the milker from zoonotic diseases such as leptospirosis.
Cow Preparation
The cleaner the cows are, the easier it is to milk them. This means clipping the cows tails three to four times annually and keeping the cow’s environment clean, such as roadways, gaps, and winter housing. Clusters should be attached to clean dry teats. If dirty, they must be washed and dried. It is also best practice to strip each quarter to check for mastitis. This will also help to stimulate milk let down.
Preparing in Batches
Preparation of cows should take place in groups of 4–6, starting from the front of the row and working downwards towards the end. Preparation of each cow takes place first, followed by cluster attachment to the same group in the same sequence.
Cluster Attachment
When attaching the cluster, keep the pulse and milk tubes on the cow exit side of you, ensuring that they are not in the way when moving to the next cluster. Hold the cluster with the hand closest to the cow exit side (usually the hand nearest to the dairy). This means that you will change hands to hold the cluster depending on which side you are attaching the cluster, as illustrated in Figure 1. Changing hands will help minimise the risk of repetitive strain injury (RSI). Kink the tail of the liner when attaching to the cow’s teat and guide the teat into the liner with your finger. Ensure that the cluster hangs evenly on the cow’s udder to achieve good cluster alignment and good milk out in all four quarters.
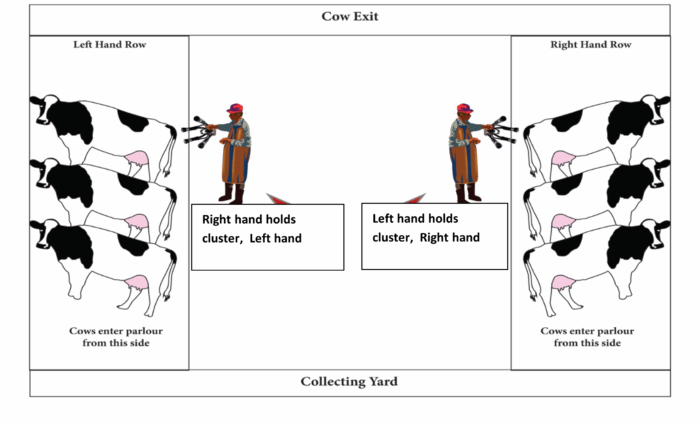
Figure 1. Milker position when attaching clusters
Right hand holds cluster, Left hand attaches teat cups. Left hand holds cluster, Right hand attaches teat cups
Cluster Removal
Manual cluster removal should start when a single stream of milk is visible in the claw piece. This minimises the risk of over milking. Remove the cluster without causing air blasts. Turn off the vacuum by kinking the long milk tube close to the claw piece or using the button on the claw piece, and allow the cluster to become limp on the udder. If automatic cluster removers (ACRs) are present, ensure that they are operating properly.
Teat Disinfection
When a batch of 4-6 cluster units have been removed, teat spray or dip the batch of cows in the same sequence. Ensure that at least 15 or 10 mls of the spray or dip respectively, are applied evenly to the teats of each cow after each milking. Ideally, this should be done as soon as possible after cluster removal. Cover the entire barrel of the teat from tip to top.
Cow Flow
Cow flow is the movement of cows from the paddock or the cubicle shed into the collecting yard, through the milking parlour and back out again. This will have a big impact on the milking routine. Cow flow encapsulates three areas: cow roadway, facilities (collecting yard and parlour), and the milker. The cow roadway needs to be wide enough for the number of cows being milked, with a good camber and surface. Table 1 outlined the width required for various herd sizes. It’s also important that there are no pinch points or restrictions along the roadway. The collecting yard needs to accommodate all the herd, (1.5M² per cow), and if a backing gate is present, it needs to be operated correctly. The backing gate should be used to decrease the size of the collecting yard and not force the cows into the parlour. The milker can also have a big impact on cow flow. They need to be calm and consistent and have the same routine at each milking
Table 1. Farm roadway width required for various herd sizes
| Herd Size | Roadway Width (Metres) |
| 50 | 3.5 |
| 100 | 4 |
| 150 | 4.5 |
| 200 | 5 |
| 250 | 5.5 |
| 300 | 6 |
Washing Up
Cleaning the milking parlour after each milking is essential. The parlour should be washed down when the last row of cows have left, and the washing of the milking equipment has commenced. This minimises the risk of contamination of the milk produced. Having a standard operating procedure (SOP) in place for both the milking and wash routines is essential, particularly for new members of staff
Conclusions
Milking cows require doing the simple things well and paying attention to detail. Milkers need to remember that they are producing a food, and the quality of this food is paramount in sustaining existing markets and creating new markets. A good milking routine is a key driver of milk quality and creating a safe environment for both milkers and cows. Milkers should also try and incorporate changing hands during milking to reduce RSI.